New LED Control boards released

If you want to control the power output of your LED lighting, you can use the LPF-xxD LED powersupply controller range for this. These power supplies come with an control signal input. By controlling the resistance on the control cable, you can control the actual light output (constant current limiting).

To easily control this "control signal", I have designed a simple PCB. It just require an opto isolator and some resistors.

You can purchase the boards as a kit, where you (simply) have to solder on the components or you can buy them ready to use.

https://shop.pi3dscan.com/Webwinkel-Product-222206135/LED-Control-board-(dimming)-Ready-to-use.html

High CRI Led light test

CRI (color rendering index) is a measure of how accurately a light source illuminates objects' true colors. We wanted to know how this impacts the images taken by the Raspberry PI Camera (5MP and 8MP). So we did a test, check out the results here

DSLR Support

Want to mix Raspberry PI cameras and DSLR? This is now possible with the latest release (v.4.5.5). In this release you will need one dedicated raspberry per DSLR camera (in next release multiple DSLR per raspberry will be supported). Just connect the DSLR camera to one of the USB ports of a Raspberry running in mode 5 and make sure that you can trigger the DSLR camera using the GPIO ports. Easiest way is to just use a simple opto-isolator for this.

Main reasons to add DSLR camera(s) to you setup:?

- A single DSLR with wide angle to capture a high quality picture of the person being scanned, for instance as print out when people have visited your scanner.

- Multiple DSLR cameras aimed for instance at the face, to capture a much higher quality mesh/texture for the face region.

If you connected the DSLR up correctly, you do not need to do anything special. The DSLR camera is automatically detected and you can make scans, preview images from all cameras including the DSLR camera(s) and download all the images.


For detailed interface and configuration details click here

Raspberry PI Zero v2

Recently the Raspberry foundation release a new Raspberry Zero (version 2). What is great about this version is that they have added the CSI camera connector. Now the Raspberry Zero does not have on on-board network interface, but you can easily attach a micro USB ethernet adapter.

Set cost:
- Raspberry Zero - 5 Euro
- Special Zero to camera adaptor - 5 euro
- Micro USB ethernet Adapter - 4 euro

Compared to the Raspberry Model 3 price of around 35 euros a big saving!

The latest firmware supports the Raspberry Zero V2 with both the 5 and 8 mp camera (v1.3 and v2 cameras).

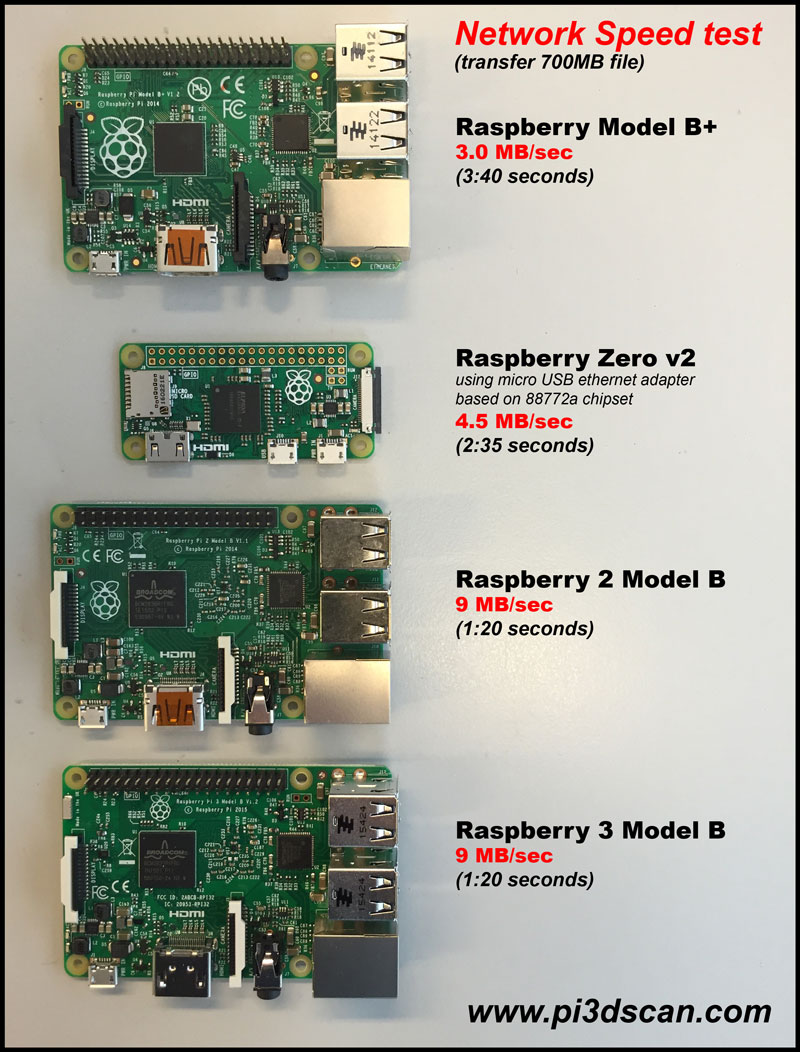
I have tested multiple Micro USB ethernet adapters. I have found that Micro USB ethernet adapters based on the 88772a chip set work great. I have found that models based on the 9700 chip set DO NOT work!!! The 9700 chip set does seem to work for normal IP traffic, but does not seem to support the multicasting needed by the pi3dscan system.

disclaimer: It looks like the Raspberry Zero v2 is a great candidate for the pi3Dscanner, the only big down side it that it is currently very hard to get. Most suppliers have a "1 per customer" policy at the moment, but I do hope the production will go up and soon we will be able to order freely multiple devices.

As you can see from the below speed test, the Zero performs fine. Sure it is a bit slower then the Model 2 and 3, but is faster then B+ the model we started out with and has proven to work fine.

Important: Because of the speed difference between the various models, do NOT mix models in a single scanner, as this will give synchronization issues.

More Articles ...