
How does it work
The Raspberry Pi 3D Scanner is based on the popular single board computer Raspberry PI 1/2/3 and the 5 or 8 Megapixel PI Camera. Support for the Arducam 16MP is currently in beta. It is designed to make a full body scan of a person in a single "shot". Each Raspberry PI unit (Camera Unit) stores the photo for later processing.
With the a set of 100 photos, you can use photogrammetry software/service like Autodesk Recap 360 or Agisoft Photoscan or Capturing Reality to turn the images into a 3D Model, with full texture (full color). These 3D models then can be used to make a 3D print (3D mini figurine), measure body or place the model in a game.
You can find sample scans in the download section, these include the original images and the 3D Model (.OBJ and texture).
Why 100 Cameras?
There are many ways to make a 3D scan of something. A popular method is by using a "hand-scanner" that typically uses RGBD depth sensing camera. This camera projects many infrared dots onto the subject and uses a camera to figure out where these dots are. A Microsoft Kinect camera or an Arctech EVA is an example of this method of scanning.
The downside with most other scanning solutions is that it takes some time to make a 3D scan, from 6 seconds to a few minutes. If you want to scan a high volume or want to scan things that can not stand still (childeren / animals), you need a solution that can scan the object in a fraction of a second.
Using a multiple camera system is not new. This has been used in the last few years typically based on 60 to 120 digital SLR cameras (canon/nikon). As you can imagine, this is a very expensive solution.
The Raspberry PI 3D scanner is a multi-camera solution for a fraction of the price. The total hardware cost (self build), including lighting is around $10,000 / € 10,000.
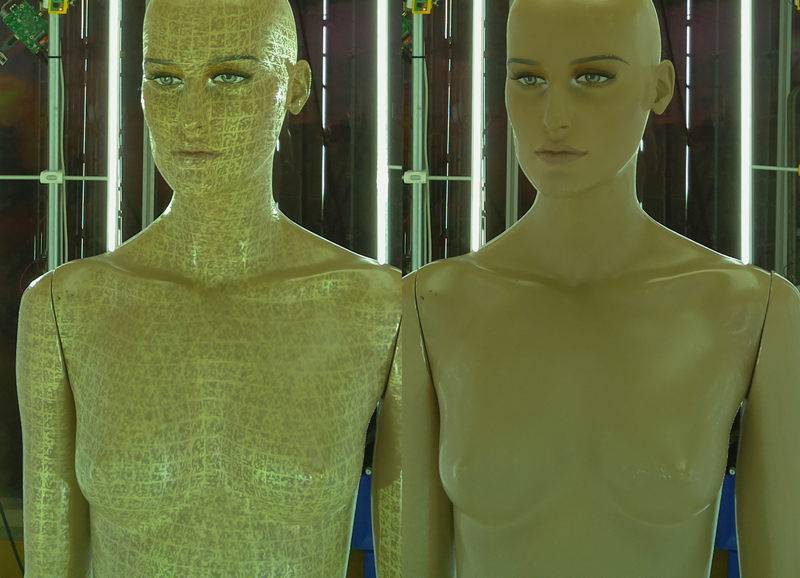
Scanning with projection
|
The Pi 3D scanner support scanning with Projection. What this means is that you can use a projection system to introduce extra "noise" on a subject. This allows you to scan things that have little or no texture, like skin or black leather. Each camera will take 2 full frame photos in 0.2 seconds. On the 1st image set no projection is present, the 2nd image set the projection is displayed. The projection is "flashed on in 300 milliseconds". The image set with projection can be used to render the 3D mesh (the actual model). The image set without projection is used to generate the texture (the colors), so that you do not see anything of the projection in the finished model. Using 2 image sets is currently only supported with Agisoft photoscan and Capturing Realitry, NOT with autodesk recap 360. |
 (click on image to see it larger) (click on image to see it larger) |