
4. Configure your setup for the first time
How to configure the software to match your setup.
After the installation of the program, launch the software and go to the “General Settings” menu.
Setup the right parameters in the settings menu for your 3D Scanner setup.
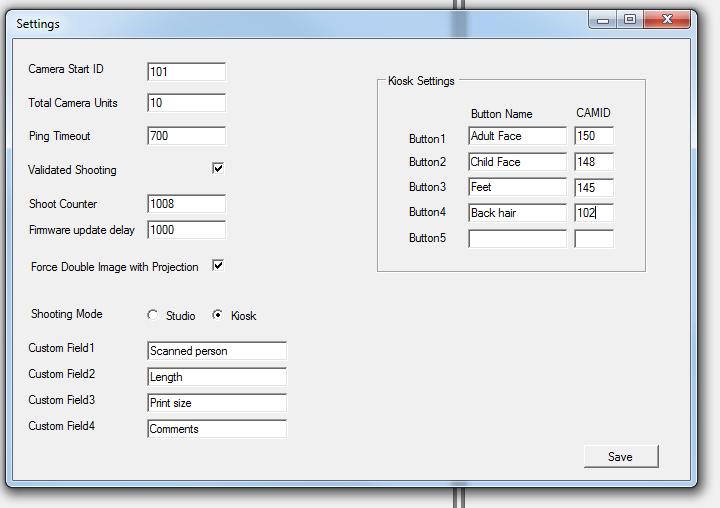
Camera Start ID - This should be the ID number of your lowest ID number given to a raspberry unit.
Total Camera Units - This should be the number of ALL raspberry units (camera, projector and live preview)
Ping Timeout - This is the delay in milliseconds between requesting a ping status from all the camera units and showing the information. If all camera units are up and running, but not all camera units are showing up in the “Camera Check” window, try increasing this number.
Validated Shooting - If this setting is enabled, you can only shoot an image if the previous image was taken and saved by all camera units and confirmed back to the 3D Control Software.
Shoot Counter - This is the unique counter for each shoot. It is used to create the directories where the files are stored in.
Firmware update delay - This is the time in milliseconds that is paused before sending an update request to the next camera unit. See the “Firmware Update” chapter.
Double Image with Projection – This forces that all image shoots will be made with 2 sets of images (See shooting with projection chapter in the manual for more details)
Shooting Mode - By default the software is running in Studio mode. This mode is designed if you run a 3D Scan studio where you want more flexability comparing and managing scans. You can also set the shooting mode to Kiosk. This mode is designed if you run a 3d Scanning booth, focused on high through put of people.
Custom Fields (1-4) - Here you can specify the names for the 4 customer fields used when you register a scan.
Kiosk Settings - Button 1 - 5 You can define up to 5 pre-set camera preview for the kiosk mode. For example the Adult head camera, a child head camera, feet, etc. Specify the name of the preview camere and specify the ID number of the camera used for this pre-set.
Register the software
When you install the software for the first time. The software will run in evaluation mode. All functionality will be available but only you can only download up to 40 images per scan.
To register you software, click on the “About” menu and click on “Registration”
Please enter the Registration Name in the same way how you have received this name from us.

The easiest way to activate your software is to click on the “Activate Online” button. For this you computer must be attached to the internet. If you do not have an internet connection, please contact us for manual action.
You can activate your software on 2 machines.